
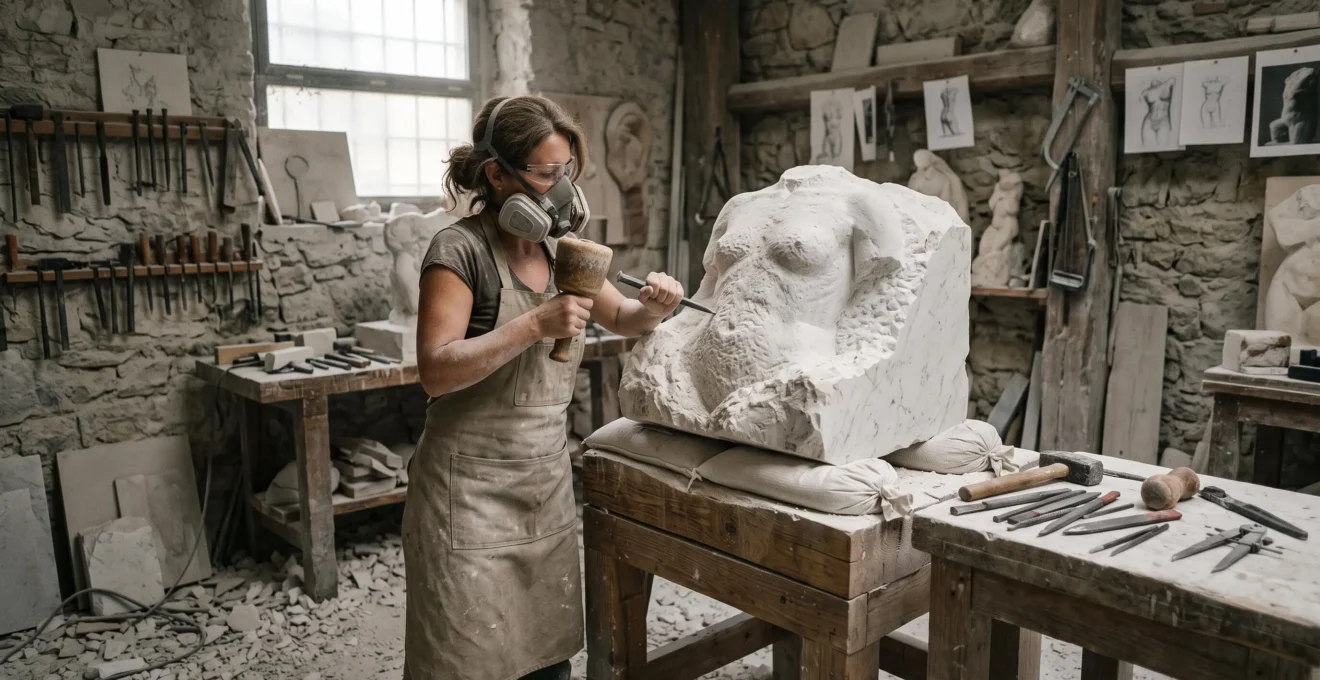
A human shoulder appears to turn beneath the surface of a marble block. A waist narrows, a knee bends, and an apparently rigid mass begins to suggest the movement of living anatomy. Yet every curve is produced by removing stone that can never be replaced.
Marble sculptors reveal fluid human forms through controlled subtraction: they establish the figure’s proportions, remove surrounding masses in stages, preserve structural support, and refine surfaces according to the anatomy and light effects they want to express. The finished figure is not literally waiting inside the block. It emerges from a sequence of spatial decisions, each constrained by the stone’s physical properties.
Traditional Italian marble carving combines visual judgement with disciplined tool progression. Selecting suitable material, anticipating fractures, transferring measurements when necessary, and resisting premature detail are as important as dexterity with a chisel.
The distinction between a convincing marble figure and an irretrievably damaged one often lies in how carefully the sculptor manages the transition from heavy mass to delicate form.
The essential principles of carving lifelike marble figures
- Establish the whole figure before refining its parts. Keep proportions, negative spaces and structural supports under review throughout roughing-out.
- Match carving force to the remaining stone. Progress from point chisels to tooth chisels, flat chisels and abrasives as surfaces become more delicate.
- Use light and surface texture deliberately. Marble’s translucency, polished flesh and retained tool marks can work together to communicate living form.
- Why Does Marble Capture Lifelike Skin Luminosity Better Than Bronze or Granite?
- How Do You See a Finished Sculpture Inside a Raw Quarried Block Before You Start?
- Direct Carving vs Pointing Systems: Which Method Produces More Spontaneous Sculpture?
- The £40,000 Mistake: The Chisel Slip That Shattered a Nearly Finished Marble Portrait
- The Finish Decision: When to Polish Marble Smooth Versus Leaving Visible Tool Marks
- Why Does One Overzealous Chisel Blow Send Cracks Through an Entire Sculpture?
- Why Must You Rough Out Entire Sculptures Before Refining Any Single Detail?
- Which Chisel Progression Safely Removes Marble From Rough Block to Refined Detail?
Why Does Marble Capture Lifelike Skin Luminosity Better Than Bronze or Granite?
Marble can resemble living skin because light penetrates some varieties of its crystalline structure and scatters beneath the surface before returning to the viewer. Bronze primarily reflects light from its exterior, while many granites produce a more visually heterogeneous appearance. Marble’s soft luminosity depends on crystal structure, impurities, thickness, surface finish and illumination—not polish alone.
Marble consists predominantly of recrystallised carbonate minerals, commonly calcite or dolomite. In sufficiently translucent varieties, incident light enters the stone and undergoes scattering and reflection around crystal boundaries and internal imperfections. Some light subsequently emerges away from its original point of entry, producing a sense of optical depth.
Human skin also exhibits subsurface light scattering, although its layered biological structure and optical properties differ substantially from marble. The resemblance is visual rather than a claim that the two materials transmit light identically.
Fine-grained, pale sculptural marbles are particularly prized for their capacity to combine relatively consistent carving characteristics with delicate light effects. The Metropolitan Museum’s audio commentary on Parian marble draws attention to the stone’s fine, even crystals and visible translucency in an ancient Greek funerary sculpture.
A polished granite surface can produce a strong reflection without producing the same apparent internal glow. Dark minerals, grain size and mineral boundaries influence its appearance. Bronze, meanwhile, creates convincing anatomy through modelling, patination and reflected highlights rather than the translucency characteristic of certain marbles.
Translucency and polish are separate properties. Polishing changes surface roughness and reflection; it does not create intrinsic light transmission in an otherwise opaque stone. Conversely, a matte marble surface may still display optical softness if the material itself is sufficiently translucent.
Historical sculptors explored these qualities through delicately carved flesh, thin folds and undercut drapery. Where sufficiently thin stone is illuminated from a favourable direction, fabric-like forms may appear unusually light. The effect is contingent on the particular marble and the remaining thickness; deep undercutting does not automatically make every piece translucent.
There is also a structural price. Removing material beneath a veil or around a fold increases the possibility of breakage. The visual effect therefore has to be balanced against the support available to the carved section.
The first decision is consequently not how brightly to polish the figure, but which block can sustain the intended anatomy and optical treatment. That judgement begins before the first chisel strike.
How Do You See a Finished Sculpture Inside a Raw Quarried Block Before You Start?
Experienced sculptors visualise a figure by examining the block’s dimensions, visible discontinuities, veining and orientation, then mapping the intended anatomy from several viewpoints. Drawings, maquettes, templates and marks directly on the marble help establish the form. The process is not mystical: it is a disciplined evaluation of what must remain and what can safely be removed.
A rough block contains possibilities, not a predetermined human figure. The sculptor must find an orientation that accommodates the pose, major anatomical masses and any necessary stone bridges. An extended arm, for example, may require a larger envelope of stone or temporary support than a compact torso.
Inspection begins with accessible faces of the block. Visible veins, bedding-like structures, colour variation and existing cracks should be recorded, without assuming that every coloured vein represents a weakness. Where appropriate, briefly wetting a clean test area can make certain colour patterns more apparent, although it cannot reliably expose hidden defects.
Marking front, back and side profiles helps establish the maximum dimensions of the intended sculpture. A useful exercise is to draw the figure’s centreline, shoulder width, pelvic orientation and outer silhouette before removing substantial material.
Consider the block from all accessible directions. A pose that fits elegantly in the front elevation might place an elbow beyond the available depth or leave insufficient stone beneath a projecting wrist.
Negative space is the sculptor’s second drawing. The opening beneath an arm, the interval between the legs and the separation between the chin and chest must be planned as carefully as the solid anatomical volumes. Carving these openings too early can weaken the stone before adjacent masses have been established.
Historical evidence shows that such planning was central to major marble projects. The Metropolitan Museum’s research on Michelangelo at the marble quarries describes his direct involvement in selecting material and specifying the dimensions and shapes of blocks destined for sculpture.
A clay, wax or plaster maquette can establish a composition, but translating it into stone presents additional problems. Enlargement magnifies small proportional inconsistencies, while the model’s freely projecting elements may be too delicate to reproduce securely in marble.
For that reason, a model should be checked against the real block rather than treated as an unconditional instruction.
- Preserve the original composition when the irregularity is superficial and the intended form retains adequate sound material.
- Adapt the composition when a structural discontinuity threatens an essential thin section or support.
- Reject or reassess the block when the required changes would compromise the figure’s purpose, particularly in a commissioned likeness.
The governing judgement is whether the design remains both visually coherent and structurally feasible. A compelling silhouette is of little use if it relies on an unsupported bridge of fractured stone.
This preparatory discipline does not eliminate artistic freedom. It establishes the limits within which the sculptor can respond creatively to discoveries made during carving.
Direct Carving vs Pointing Systems: Which Method Produces More Spontaneous Sculpture?
Direct carving generally allows greater spontaneity because the sculptor develops the form while working into the stone, adapting proportions and surfaces to the material. Pointing systems prioritise accurate transfer from an established model using measured reference positions. Neither approach guarantees artistic quality: the appropriate method depends on the commission, acceptable risk and desired freedom to revise.
In direct carving, the artist works from an evolving mental image, drawings or preliminary studies without mechanically reproducing every surface coordinate. The block itself can influence the final composition. Variations in grain, unexpected veins and changing relationships between masses become part of the design process.
This responsiveness was important to the twentieth-century direct-carving movement, whose practitioners emphasised engagement with the material rather than treating stone solely as a replica of an already completed model.
A pointing system follows a different logic. A plaster model provides measured reference positions that can be transferred to a marble block with a pointing machine. The carver uses those positions to determine how much material remains to be removed at selected locations.
Pointing became an important technique in workshops producing carefully modelled sculpture, including nineteenth-century commissions. It enabled assistants to undertake substantial stone removal while maintaining reference to an approved form.
The National Gallery of Art’s account of Canova’s sculpting process describes how the sculptor developed models in clay and plaster, used transferred reference marks in his workshop and personally refined significant final surfaces.
For practical purposes, the distinction is best understood as a distribution of decisions rather than a contest between authenticity and mechanical reproduction.
| Decision criterion | Direct carving | Pointing system |
|---|---|---|
| Creative flexibility | High while substantial stone remains | More constrained by the approved model |
| Faithfulness to a model | Depends on observation and measurement | Supports systematic dimensional transfer |
| Commissioned portraiture | Demands strong anatomical and likeness control | Useful when an approved likeness must be preserved |
| Irregular stone | Permits continuing compositional adaptation | May require revising the model or transfer strategy |
| Primary risk | Irrecoverable visual and proportional decisions | Incorrect reference setup or excessive reliance on measurements |
A pointing machine reduces transfer uncertainty; it does not guarantee fidelity. Incorrect setup, misleading reference positions, unsuitable stone or poor interpretation between measured points can still cause substantial errors.
Hybrid practice is often particularly useful. A carver may establish the large masses by eye, then check critical facial landmarks, symmetry or distances with calipers and templates. Measurement can protect the original intention without dictating every gesture of the finished surface.
Regardless of the method, the sculptor eventually confronts the same physical constraint: an inaccurate or excessively forceful cut cannot be reversed by returning to the model.
The £40,000 Mistake: The Chisel Slip That Shattered a Nearly Finished Marble Portrait
A single badly directed chisel strike can ruin an almost completed marble portrait when it fractures a delicate feature or propagates an existing weakness. The £40,000 figure is an illustrative potential loss, not a documented incident or standard repair cost. Actual losses depend on material, labour, commission value, damage location and whether restoration remains acceptable.
Imagine a hypothetical commissioned portrait approaching its final refinement. The face has been established, the shoulders reduced, and the marble beneath the jaw is approaching its intended thickness. The carver strikes near an unsupported edge, and a section breaks away across a critical anatomical boundary.
At an early stage, such damage might be accommodated by changing the pose or reducing the surrounding form. Near completion, the same fracture may destroy the likeness or remove the material necessary for an essential feature.
Late-stage accidents are disproportionately consequential because the reserve of removable stone has largely disappeared. A cheek, nostril, eyelid or transition beneath the chin may depend on relatively small remaining volumes.
The fracture mechanism depends on the geometry of the tool and the condition of the stone. A chisel that bites too deeply can act as a wedge. One that strikes obliquely near a sharp edge can initiate local chipping or a larger crack, especially where the surrounding marble offers little support.
Internal discontinuities may alter the path of the fracture. However, an accidental blow does not necessarily release a pre-existing internal stress, and neither crystal orientation nor an apparent vein alone predicts how far a crack will extend.
Hypothetical workshop scenario: a damaged portrait jaw
A nearly finished marble portrait is being refined beneath the chin. The sculptor uses a mallet-driven chisel too close to a narrow stone connection. The tip catches at an unfavourable angle, breaking away part of the jaw contour.
The immediate decision is whether sufficient original stone remains for an acceptable re-carving. Mechanical pinning, adhesive repair or replacement of the section may be technically possible in some circumstances, but could remain visible and may be unacceptable for a high-value original commission. The scenario illustrates risk; it is not evidence of a real £40,000 accident.
Prevention starts with stable mounting. A block that shifts under the tool makes precise contact difficult. Support systems must suit the mass, geometry and working position of the sculpture, rather than relying on an improvised arrangement that permits rolling or slipping.
As anatomy becomes thinner, the carver should reduce impact, refine tool placement and transition to controlled hand tools or abrasives when appropriate. Hands should remain outside the expected tool travel and fracture path, with the work secured so that the operator does not need to hold it in a hazardous position.
Protection against airborne respirable crystalline silica, flying fragments and noise must also be appropriate to the operation. These occupational hazards are separate from the danger of damaging the sculpture.
The financial consequences may be severe, but the underlying failure is physical: too little remaining support for the force introduced. That same consideration must govern the subsequent choice of surface finish.
The Finish Decision: When to Polish Marble Smooth Versus Leaving Visible Tool Marks
Polish marble when a smooth, light-responsive surface supports the intended portrayal of flesh or refined anatomy. Retain controlled tool marks when texture communicates hair, cloth, raw stone or the energy of carving. Mixed finishes can make these qualities reinforce one another, but their placement should follow the sculpture’s visual purpose rather than a universal rule.
A polished surface tends to produce more defined reflections and can enhance the perceived smoothness of marble anatomy. On suitably translucent stone, this may contribute to the impression of supple skin. The effect varies with illumination and material: a glossy surface is not necessarily more lifelike in every composition.
Tool-marked marble communicates differently. Parallel claw-chisel cuts can suggest direction and rhythm, while broader flat-chisel facets register deliberate shaping. Rough stone beside a refined face can make the anatomy appear to emerge directly from the block.
A documented example is Auguste Rodin‘s Katherine Seney Simpson (Mrs. John W. Simpson), dated 1902–1903. The National Gallery of Art’s record of Rodin’s Katherine Seney Simpson describes smoothly finished areas around the neck, shoulders and chest, contrasted with rougher marble retaining visible parallel chisel marks below.
This juxtaposition offers a practical principle: distinguish areas by the qualities they need to communicate, without assuming that every exposed anatomical surface requires a mirror finish.
Finishing should be planned by zone before the last significant tool passes. The transition from visible chisel texture to a refined surface commonly involves rasps or rifflers, followed by progressively finer abrasives. Each stage removes or softens marks left by the preceding tool.
Once deliberate carving marks have been ground away, they cannot simply be recovered by reversing the polishing process. New marks can be introduced, but the original surface has been altered, and any reworking removes further material.
For public installations, maintenance deserves equal consideration. Smooth polished marble can show scratches, dull patches and acid etching conspicuously. Tool-marked surfaces may disguise some fine abrasions, yet their recesses can also collect dirt and make cleaning more difficult.
Outdoor weathering may progressively change either finish. Surface durability is influenced by stone composition, exposure, pollutants, water and maintenance practices, not simply by the decision to polish.
Test the intended textures on offcuts of the same marble under lighting comparable to the installation. Observe them from the expected viewing distance as well as at the workbench.
A successful finish preserves the intention of the carving. Its quality depends not only on surface appearance but also on whether the thin forms beneath that surface have survived the preceding tools.
Why Does One Overzealous Chisel Blow Send Cracks Through an Entire Sculpture?
A heavy chisel blow can initiate a crack beyond the immediate contact area because marble is brittle and existing flaws can concentrate stress. If the advancing crack encounters vulnerable grain boundaries, fractures or thin unsupported sections, it may extend through a much larger region. The result depends on local geometry, material structure, tool action and impact energy.
Marble’s interlocking crystals give the stone its characteristic working properties, but they do not make it immune to fracture. Under excessive or poorly distributed force, cracks can initiate at tool contact points, pores, microfractures or other stress concentrations.
Some mineral crystals exhibit cleavage, and cracks may also follow grain boundaries or pre-existing fractures. Nevertheless, marble does not possess a single predictable plane along which every impact will travel. The stone’s fracture behaviour depends on its particular microstructure.
Two failure mechanisms deserve separate attention.
- Wedge-driven splitting: a deeply engaged chisel converts applied force into lateral pressure, potentially opening a fracture instead of removing the intended chip.
- Impact crushing and bruising: excessive force or unsuitable contact geometry damages stone immediately beneath or around the cutting edge, sometimes introducing microcracks that become more significant during later refinement.
The difference matters because prevention is not identical. Wedge-related problems call for shallower engagement, smaller removals and better awareness of the available stone mass. Bruising requires attention to tool sharpness, impact intensity, contact area and surface condition.
Risk rises when surrounding material has already been removed, leaving an arm, fold or narrow connection unable to resist the force transmitted through it. Existing cracks are especially important; a coloured vein without structural separation is not automatically equivalent to a crack.
Water ingress and freeze–thaw cycling can aggravate damaged or exposed stone under suitable conditions. Moisture alone, however, does not establish that a particular marble block is structurally unsound.
A carver should watch for changing resistance, unexpected flaking, visible crack growth and altered sound during impact. Listening and feeling provide useful workshop feedback, but neither substitutes for a closer inspection when damage is suspected.
Sharp, appropriate tools support controlled cutting. A dull cutting edge may encourage excessive force or unpredictable movement, particularly near delicate features.
The practical response is to reduce chip size and impact intensity as the remaining form becomes finer. Where a defect threatens a structural connection, stop and reassess the carving rather than attempting to force the original shape through it.
The safest carving sequence anticipates this vulnerability early, while enough marble remains to provide support and accommodate changes in the figure.
Why Must You Rough Out Entire Sculptures Before Refining Any Single Detail?
The entire sculpture should be roughed out before individual details are finished because subtractive carving cannot restore missing material. Keeping all major regions at comparable stages preserves the ability to correct proportions, balance volumes and adjust the pose. Refining a face or hand prematurely can lock the sculptor into dimensions that the remaining block cannot accommodate.
At the outset, the carver must establish the overall envelope of the figure: height, width, depth, orientation and principal anatomical masses. The work then proceeds through increasingly precise relationships between those masses.
A common error is to finish the face while the shoulders and torso remain substantially oversized. The result may be attractive when viewed in isolation, but the finished head establishes constraints that make correcting the neck, posture or relative scale difficult.
For instance, if the apparent shoulder width later needs to shrink, an already completed neck transition may no longer correspond to the intended pose. Removing more stone from the head is not necessarily possible without altering the expression or losing the likeness.
Keep the whole figure at a comparable level of resolution. This does not require removing identical depths everywhere. It means delaying local finalisation until the larger anatomical relationships are sufficiently secure.
A practical roughing sequence moves through the block repeatedly, progressively refining the whole form:
- Establish the maximum outer silhouette and orientation of the pose.
- Separate the principal masses, including head, torso, pelvis and limbs, while preserving necessary supports.
- Check front, side and three-quarter views for proportional disagreement.
- Define major anatomical transitions and planned negative spaces without prematurely opening delicate connections.
- Only then advance toward secondary anatomy and precise surface details.
The principle also makes structural problems easier to manage. During roughing-out, the sculptor may uncover a fissure, discover a problematic vein or recognise that the intended balance requires more supporting marble. If the figure remains broadly oversized, alternative arrangements may still be possible.
Visual progress is not always proportional to useful progress. A beautifully finished ear may feel like an achievement, but if the surrounding head mass is unresolved, it can be an expensive commitment rather than a genuine advance.
A regular audit should ask whether any area looks conspicuously more finished than the rest and whether its position remains compatible with the overall figure.
Once the figure’s proportions and essential structural relationships are secure, finer tools can be introduced in a controlled progression rather than used to compensate for mistakes made during roughing-out.
What to establish before changing tools
- Uniform progress: the whole figure should have coherent proportions before isolated details are brought to final form.
- Sound support: major cuts should not leave unexpected thin bridges, deep pits or unassessed fractures.
- Controlled reduction: the next tool must remove smaller amounts of stone with less force as the shape approaches its intended surface.
Which Chisel Progression Safely Removes Marble From Rough Block to Refined Detail?
A traditional marble-carving progression moves from the point chisel for substantial removal, through the tooth chisel for surface regularisation, to the flat chisel for refined planes. Rasps, rifflers and progressively finer abrasives follow for detailing and finish. The central safety principle is to reduce material removal, cutting depth and impact force as the sculpture approaches its final geometry.
The point chisel, or subbia in traditional Italian terminology, establishes initial volumes and removes excess marble. It concentrates force on a small contact area, producing chips and irregular cavities. Its effectiveness makes it valuable during roughing-out but increasingly hazardous near delicate anatomy.
The tooth chisel, commonly called a gradina, carries multiple cutting teeth. It reduces point-chisel irregularities and helps establish continuous surfaces while leaving characteristic parallel grooves. Different tooth profiles and widths suit different stages of work.
The flat chisel, or scalpello, refines planes, transitions and contours. It is most effective where the underlying surface has already been sufficiently prepared to permit small, controlled cuts.
Rasps and rifflers offer additional control around curved anatomical transitions, recesses and difficult-to-reach areas. Abrasives subsequently refine the surface according to the selected finish.
Tool progression is a reduction in cutting aggressiveness, not a rigid angle prescription. Point chisels may use a comparatively direct approach for rough removal; tooth and flat chisels are generally applied with controlled, often more oblique cutting actions, depending on tool geometry and the stone’s response.
No single striking angle is appropriate for every chisel or carving operation. What matters is that the cutting edge removes the intended material without wedging deeply into unsupported stone.
| Stage | Primary tool | Checkpoint before advancing |
|---|---|---|
| Bulk reduction | Point chisel | Principal masses established, adequate material retained for corrections |
| Surface regularisation | Tooth or claw chisel | Deep isolated pockets removed and surface transitions controlled |
| Plane refinement | Flat chisel | Near-final contours coherent without excessive local cutting |
| Detailed shaping | Rasps and rifflers | Tool marks and fine anatomical transitions consistent with the design |
| Final finishing | Progressively finer abrasives | Required polish or retained texture achieved without unwanted alteration |
Skipping stages often creates unnecessary risk. A flat chisel applied aggressively to a deeply pitted surface may catch an irregularity, while a point chisel used too late can fracture a narrow feature. An intermediate pass allows the carver to assess the material before committing to finer surfaces.
Uniform texture is a useful visual checkpoint, but uniformity alone does not prove that the stone is free from internal defects. Any newly exposed crack or suspicious discontinuity requires separate assessment.
Five verifiable checkpoints before refining marble
- Map the remaining volumes. Mark principal anatomical boundaries and the stone that must remain for support; produce an updated front-and-side outline.
- Inspect newly exposed surfaces. Check for cracks, deep pits and irregular discontinuities; produce a marked defect record identifying areas requiring reassessment.
- Regularise the rough texture. Use the appropriate intermediate chisel to reduce isolated point-chisel cavities; produce a surface with visibly controlled cutting depth.
- Verify anatomical landmarks. Compare the intended proportions with measured or marked reference positions; produce a checked set of critical dimensions.
- Approve the next finishing stage. Examine each zone under raking light and identify its intended texture; produce a zone-by-zone finishing plan before finer cutting or abrasion.
These checkpoints form a practical workshop framework rather than a universal standard or a substitute for professional instruction. Large blocks, suspended loads, unstable pieces and powered equipment require additional task-specific controls. Wet methods or effective dust extraction, appropriate respiratory protection and safe handling practices remain essential where respirable crystalline silica may be generated.
Finishing also calls for restraint. A scraper, riffler or abrasive can remove a surprising amount of material from a small anatomical feature if used without frequent visual checks. The final passes should preserve the intended form, not gradually reshape it.
Before the next carving session, inspect the block from several viewpoints, identify the least-developed major surface and choose the lightest appropriate tool capable of advancing it. Repeat that assessment as the figure emerges: in marble, precision comes from knowing how much stone to leave behind.
Can an existing crack in marble be repaired before carving?
Some cracks can be stabilised using appropriately selected conservation or stoneworking techniques, but suitability depends on crack depth, orientation, movement and structural significance. A superficial repair does not necessarily restore the strength needed for a projecting limb or other load-bearing feature. Assess the damage before removing additional support, and seek specialist evaluation where structural integrity is uncertain.
Is Carrara marble always the best choice for figurative sculpture?
No. Carrara marble has a distinguished sculptural history, but the suitability of an individual block depends on its mineral characteristics, colour, grain, defects, dimensions and intended finish. Other sculptural marbles may offer suitable working and visual properties. Evaluate the particular material rather than relying solely on its geographical name.
Can a marble sculpture be carved without a full-size plaster model?
Yes. Direct carving can proceed from drawings, a smaller maquette or a developing composition, with proportions checked throughout the process. A full-size plaster model becomes especially useful where precise reproduction, complex anatomical relationships or an approved commissioned likeness must be maintained.
How should sculptors judge whether a thin marble section has enough support?
Consider the section’s geometry, orientation, connection to surrounding masses, marble quality, visible fractures and anticipated handling or installation loads. There is no universally safe thickness applicable to every stone and sculpture. Fragile or structurally significant elements require individual assessment rather than reliance on appearance alone.
Does polishing make a marble sculpture more durable outdoors?
Polishing changes surface texture and appearance but does not make marble immune to moisture, weathering, acidic pollutants or physical damage. Exposure conditions, material properties, detailing, drainage and maintenance strongly influence durability. Select a finish for both visual intent and the demands of its installation environment.